Portal
Part I
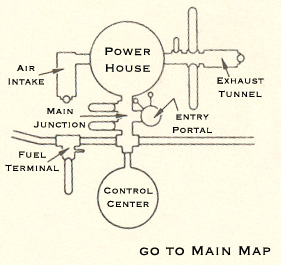
The
entry portal, gateway to the entire Titan I underground complex, is a
vertical reinforced concrete cylinder 27 feet in diameter and 75' 2"
from the top to the outside of the bottom slab comprising the
portal floor. The open interior is 69' 2" from grade
to the floor making the bottom concrete slab 6 feet thick.
|
Side
view of the portal silo showing the silo doors, crew entrance, spiral
staircase and the portal stairs descending around the freight elevator
cage to the bottom of the portal.
|
The
silo itself has 2 massive doors each roughly 9'x11' and 3'6" thick protecting the complex from the terrific forces of a
nuclear attack. Each door opens with 2 powerful hydraulic
rams which allows a 4 ton capacity freight elevator,
approximately 10'x10' to rise to the surface. The elevator
carried equipment and
supplies too large for the stairs into the complex and allowed for removal of refuse and other
material from the site without the terrible burden of lugging them up 7 stories of staircase. Whew!
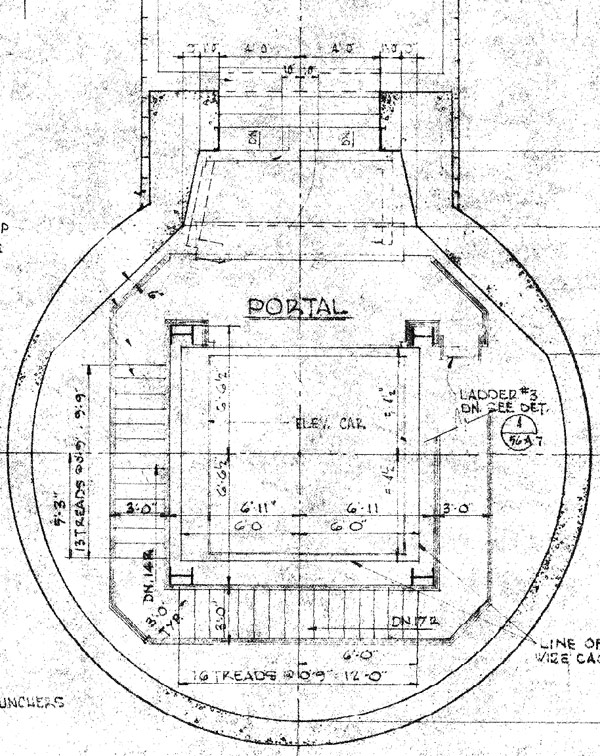
The
elevator cage occupies the center or the portal silo and is enclosed in heavy
wire mesh. About the elevator shaft the narrow stairway and landings
slowly twist their way down to the bottom.
|

Side
view of the portal showing the blast wall and doors at the bottom of the
portal and the connecting passage to tunnel junction #10.
|
|
Detail
of the silo doors and associated structures including the hydraulic
system and rams that opened them.
The
concrete around the perimeter and the doors themselves contains embedded
copper tubing through which heated ethylene glycol is circulated during
cold weather to prevent snow and ice build-up and to keep the doors from
freezing shut.
|
There
were several other openings at the surface of the portal aside from
the giant silo doors. The first of these was of course the
personnel access where crews entered and exited the complex. Two
other openings were for a television camera and for an instrument
array.
|
A
cutaway view of the Portal silo showing the silo doors, television
camera and instrument mount access tunnels (upper right), elevator cage
and stairs. The smaller round hatch to the left of the doors is
the original personnel entrance-- a hatch 4.5 feet in diameter leading
to a spiral staircase.
|
The
television camera was for viewing the silo doors and any personnel
arriving at the site and allowed surface activity to be remotely
monitored from the control center-- an invaluable asset to an
underground installation!
The instrument array measured
surface conditions such as temperature and wind speed
and detected radiation levels and blast waves. It consisted of 4
flat-topped tubes that rose about 7 feet out of the ground.
|
Simplified
top-down cross-section of the portal silo and its structures showing the
personnel entrance on the right and the access tunnels and locations of
the instrument array (left center) and the television camera (lower
left).
|
Both
of these assemblies are protected underground when not in use in
their own small silos and are raised pneumatically from
below ground when needed.
|

Side
view of the television camera assembly and its tiny protective silo with
a concrete and steel cap about 6' in diameter. The
"silo" itself is 5' in diameter and 22' deep with a 3'
diameter tunnel connecting to the interior of the portal silo for air
lines, cabling and maintenance access.
This
blueprint doesn't show it, but a camera was mounted in the top section
in a spring-suspended cradle. The camera allowed arriving crews
and other site visitors to be identified and allowed the surface to be
monitored to ensure silos doors were open, missiles were raised properly
and any surface conditions or events.
|
|
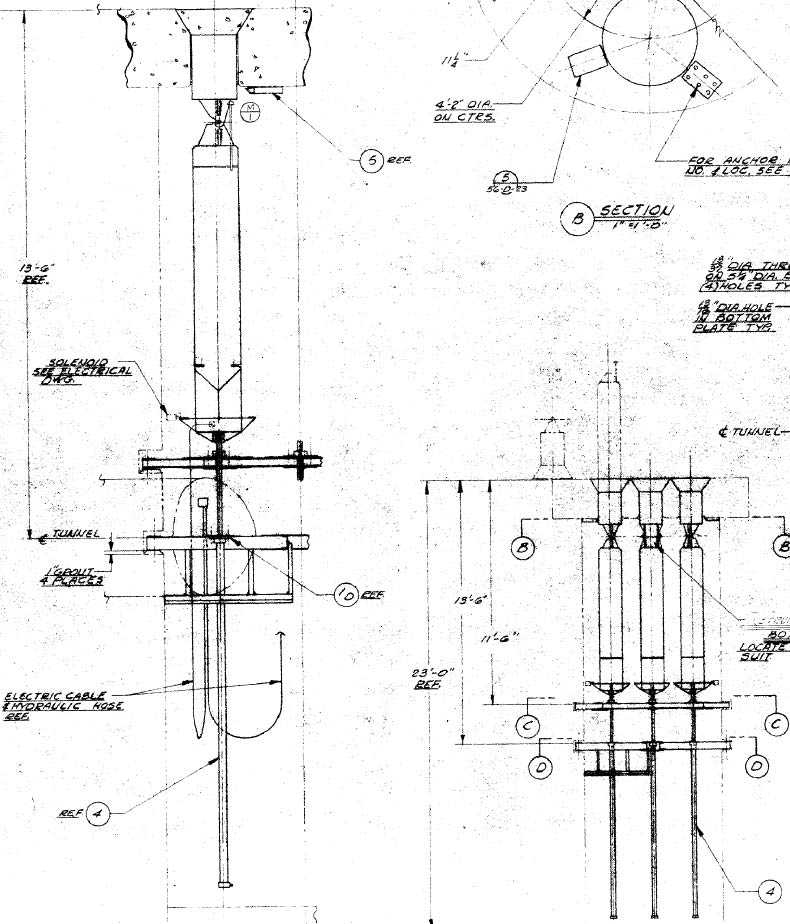
Side
view of the instrument array tube. The array consisted of 4
separate tubes with flat caps, each with their own set of instruments
and detectors. These tubes would raise hydraulically in concert
and stood around 7' tall when raised.
|
Crew
access to the complex was through a series formidable barriers
intended to repel both damaging blast waves as well as ground forces
or intruders.
Arriving
at the guard shack, visitors and relief crews are cleared with the
control center before being allowed to pass through the perimeter
fence. When they arrived at the portal they were greeted by the
4'6" steel and concrete hatch covering the personnel
entrance.
|
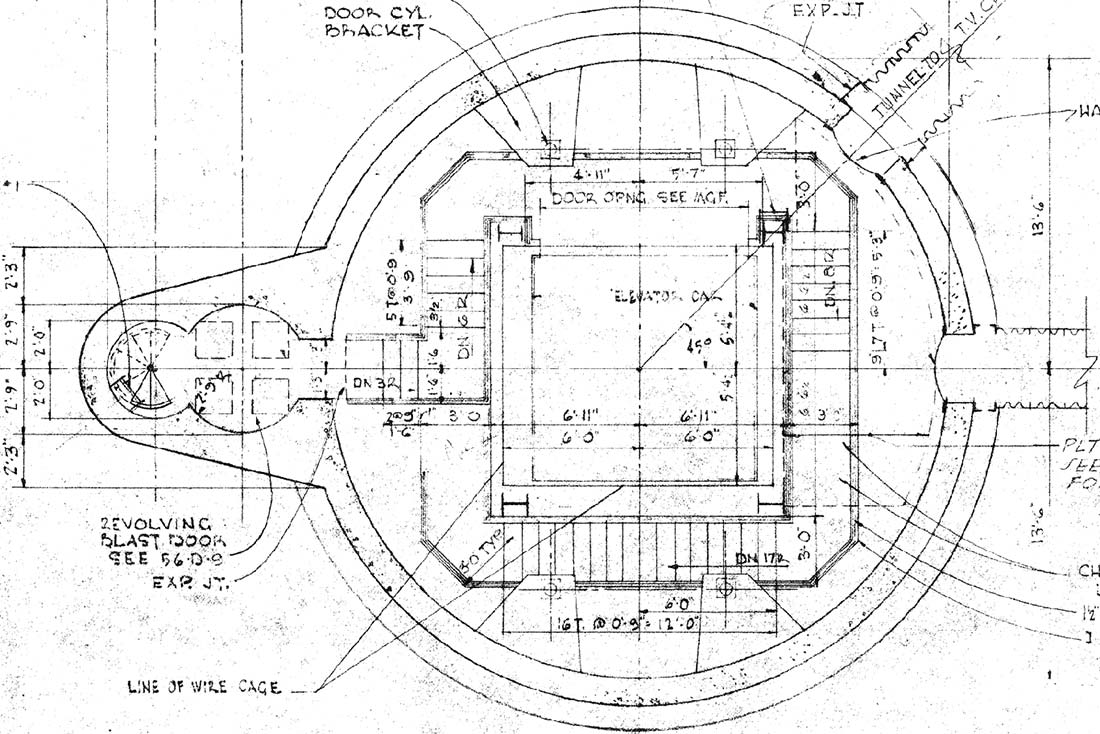
Cross-section
of the very upper portion of the portal silo showing the entrance with
its revolving blast door and the stairs and elevator.
|
Once
the hydraulic hatch was opened, a tight spiral staircase only large
enough for one person at a time was the next obstacle. This
constricting and enclosed space was no accident or oversight by the
designers of the Titan I complex; it was an effective security
measure. Any assault made on the the complex would find this small
entrance a deadly bottleneck if they dared enter through it.
Immediately
after the stairs, the next obstacle is a heavy explosion-hardened
revolving blast door. The vestibule of this door is only large
enough to accommodate 1 person at a time. This was no place for
claustrophobics; this area has a low ceiling and really only enough room
for a man to turn around.
|
The
original entrance to the site showing the spiral stairs and the
revolving blast door (at right).
|
This
cramped space is what is known as a man trap because of its
cage-like design. With the hatch closed, there would be no way out
and no way forward.
|
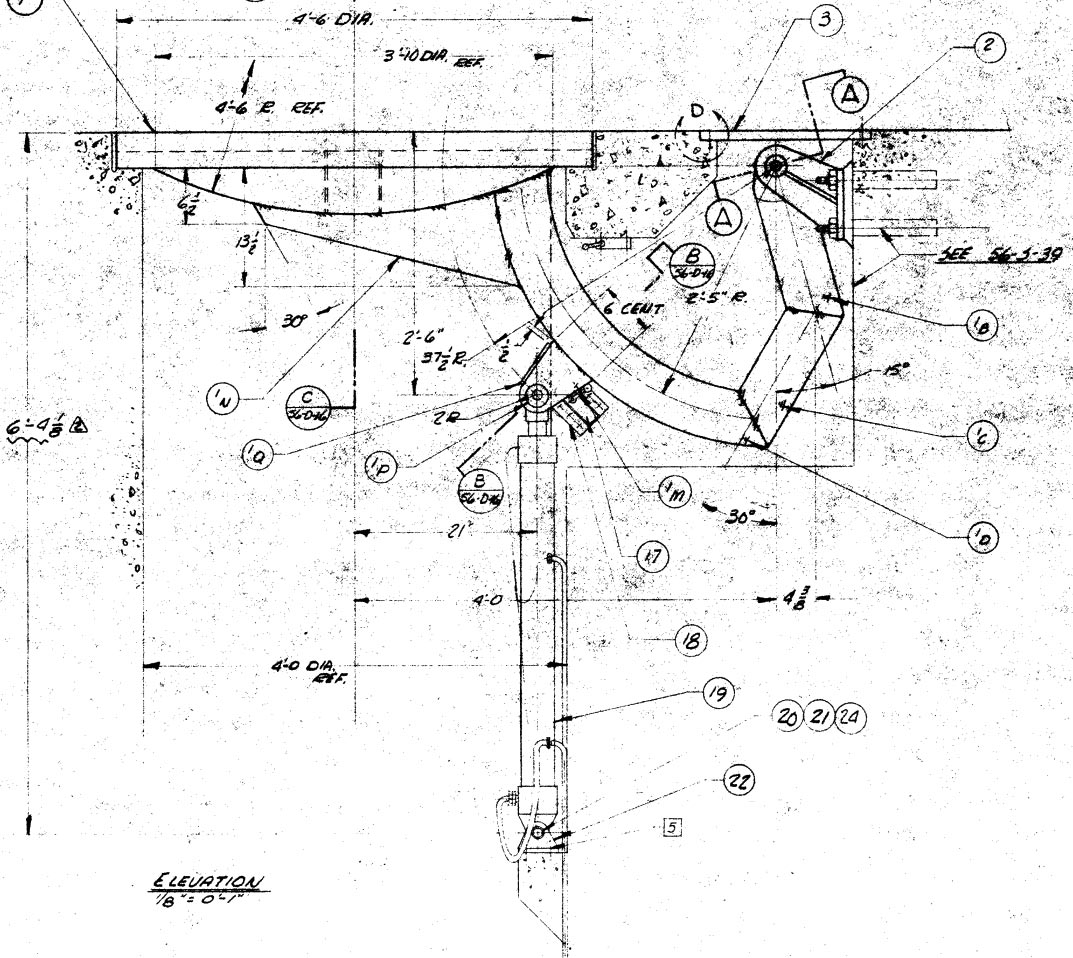
Side
view of the access hatch and opening mechanism
|
Authorized
personnel would hear a click as a remotely-operated locking bolt was
withdrawn allowing the blast door to rotate counter-clockwise.
Pressing a release lever, the entering crewman would be able to push the
door 180 degrees and enter the portal silo before it would lock
again. A camera inside the portal greeted each crew member as they
emerged from the revolving blast door.
|
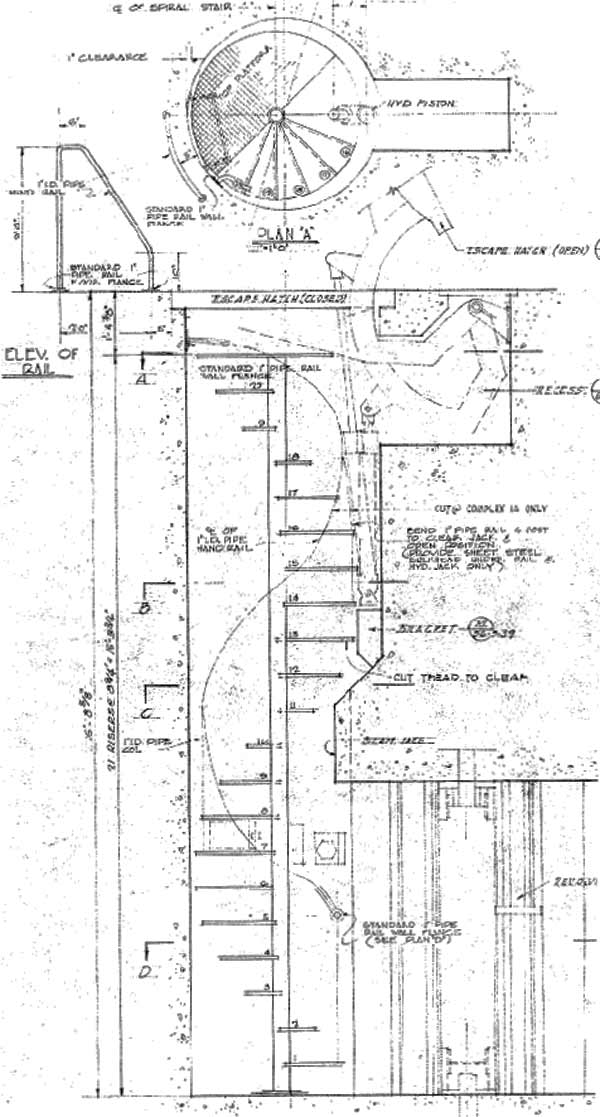
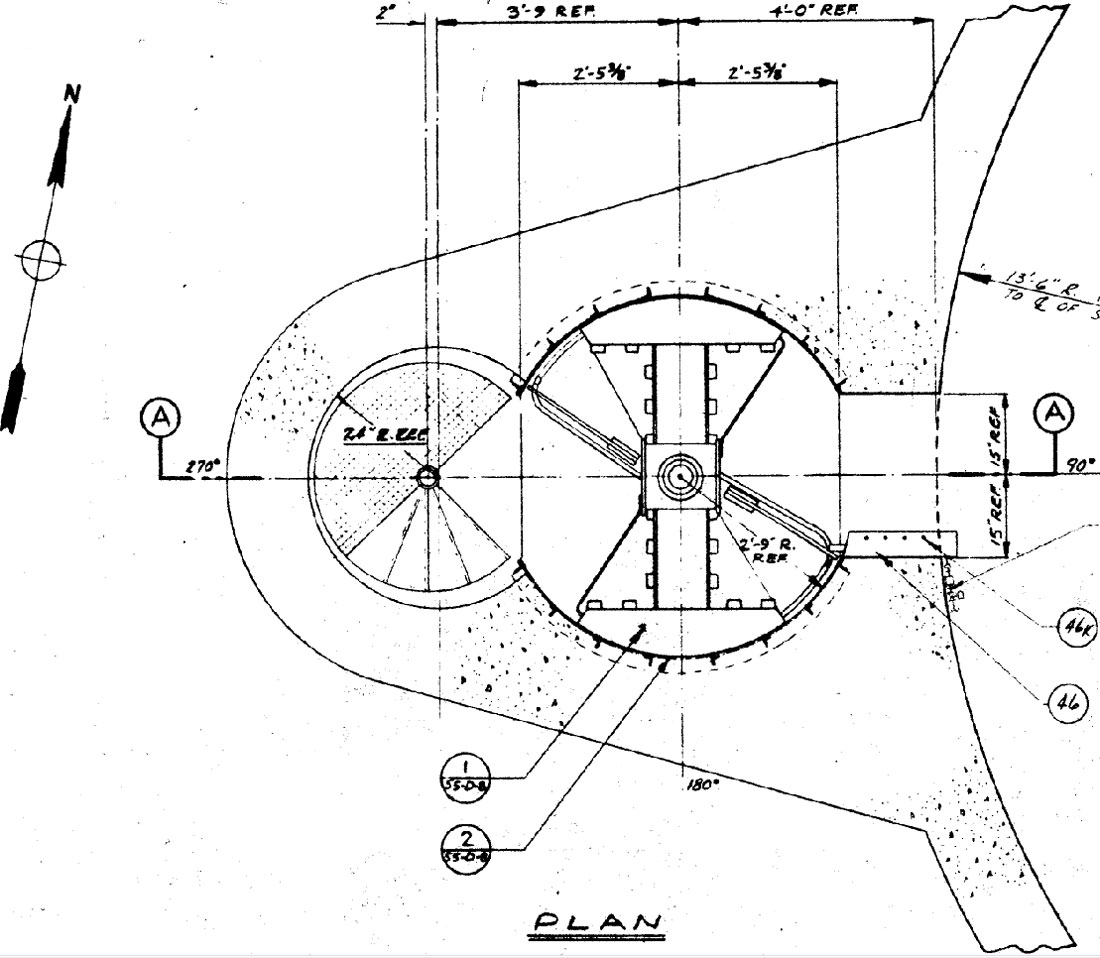
Detail
of the access portal and spiral stairs
|
|
Detail
showing the spiral stairs and revolving blast door giving an idea of the
cramped quarters that awaited crew members early in the entry of the
complex. Note that the ceiling here is less than 6'6"!
|
The
process was repeated for each crew member until everyone had filed into
the portal stairs. The access hatch was sealed after them and they
made their way to the bottom where they were met with another daunting
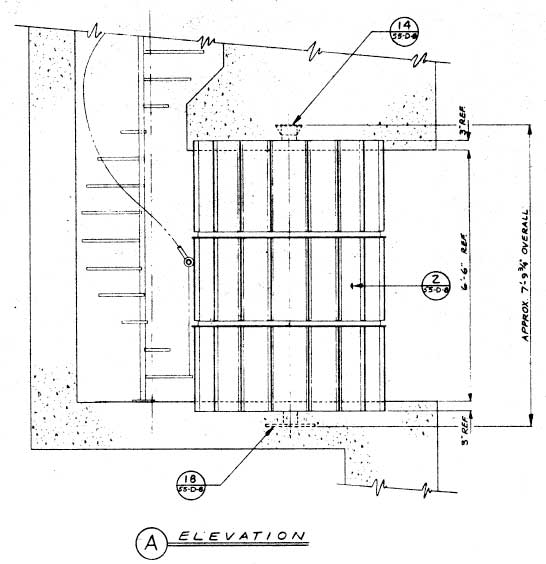
physical barrier: a pair of 8'x8' steel blast doors.
The
inner space of the portal also acts as a man trap. Escape from the
portal would be all but impossible physically once the doors were
sealed. As a matter of course, to maintain a hardened facility,
the large blast doors would remain locked until the surface doors were
secured. In this way, a blast would be prevented from entering the
main complex and causing damage that could render it unable to perform a
launch.
|
A
top-down cross section of the bottom of the portal silo showing the
hardened wall around the blast doors and the vestibule to the main
tunnel of the complex.
|
Should
infiltrators ever gain entrance to the portal, there is little they
could do from inside without passage through the blast doors. They
would be sitting ducks in the hardened concrete cage of the portal silo.
Once
beyond this last protective barrier, the crew finally entered the inner
sanctum and met with the crew they were relieving from duty and began
the briefing for turnover of command and status known as changeover.
|
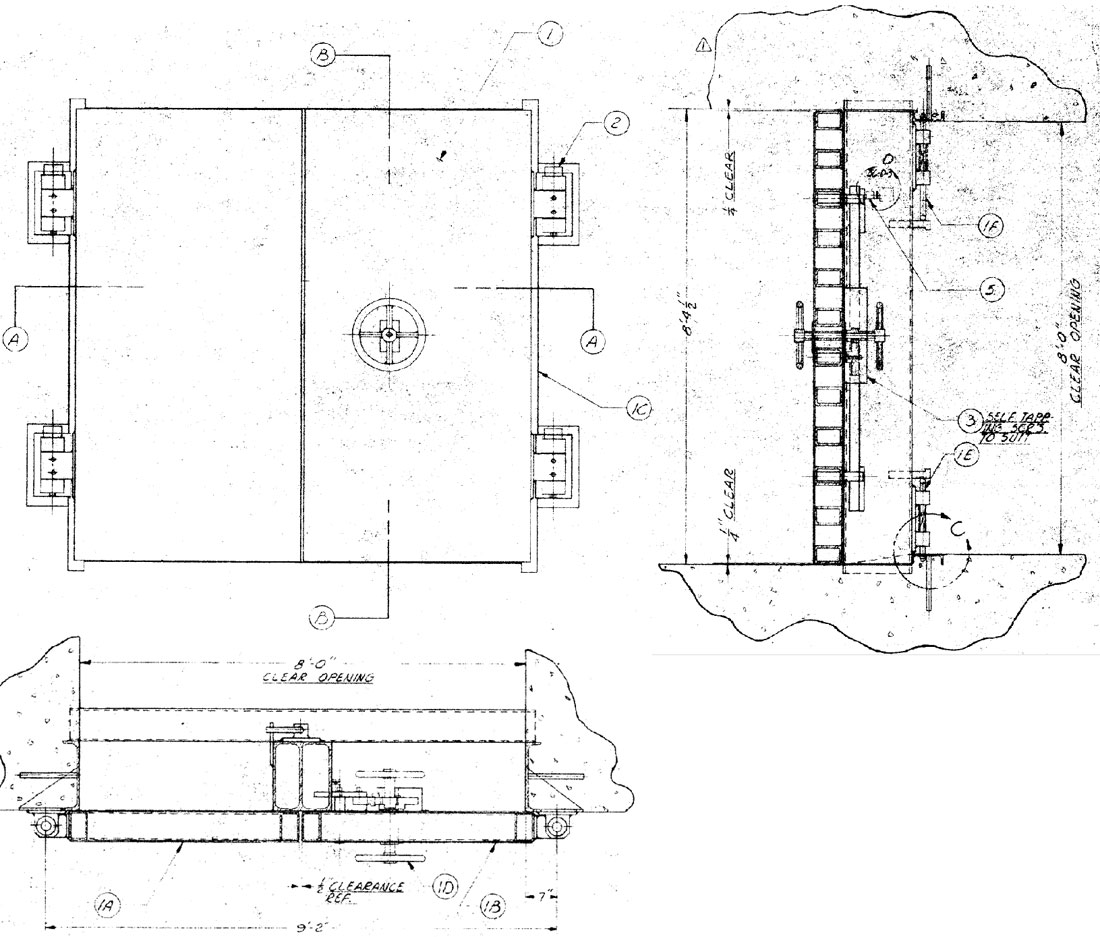
Upper
left: front view of the blast doors from the portal; Upper right: side
view of the blast doors; lower: top-down view of the blast doors.
|
Next:
Entry Portal
section II looks at the construction of the portal
silo, or if you prefer, click
below to choose another location near the entry portal, or to see the Main
Map of the complex.
Current
Location: Entry Portal part I
|
Where
would you like to go next?
|

| Contact |
Site Map | Links
|
Hosted by
InfoBunker

|

